
How to Process a Customer Return or RMA
A Return Merchandise Authorization (RMA) is the document that records what a customer is allowed to send back, why, and what you will do about it. The return cycle has three parts: first you create an RMA against the original shipment to authorize the return; then, when the goods physically arrive, you receive the RMA, which posts the returned quantity back into inventory and generates the customer's credit memo; if you authorized something incorrectly before any goods came in, you can edit or cancel the RMA. Reasons and Actions on the RMA are drawn from per-company lists, so set those up first if the dropdowns are empty.
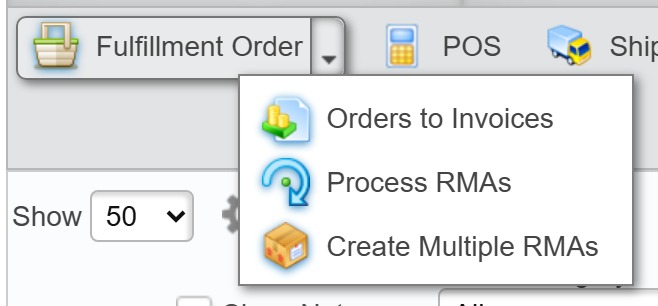
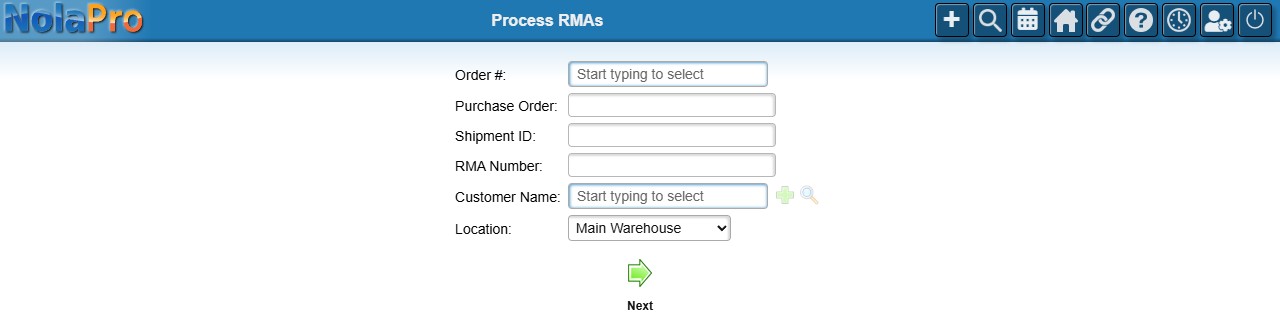
You begin every RMA from an order's Ship/Return view. Open it from Income -> Orders -> Fulfillment Order -> Process RMAs, then search by order number, PO number, RMA number, or shipment to load the shipment you are returning against; the Create RMA, Receive RMA, and Edit RMA screens all open from there. To authorize returns for several orders in one pass, use Income -> Orders -> Fulfillment Order -> Create Multiple RMAs instead.
The Process RMAs option is not a button of its own. On the Orders screen, click the small down-arrow on the right side of the Fulfillment Order button and choose Process RMAs from the menu that drops down.
Requirements
The Inventory & Ordering System feature must be enabled. The Reason and Action dropdowns come from per-company lists maintained at Admin -> Orders -> RMA Setup.
Step 1: Authorize the return (create the RMA)
Where: Create RMA — opened from the Ship/Return view (Income -> Orders -> Fulfillment Order -> Process RMAs)
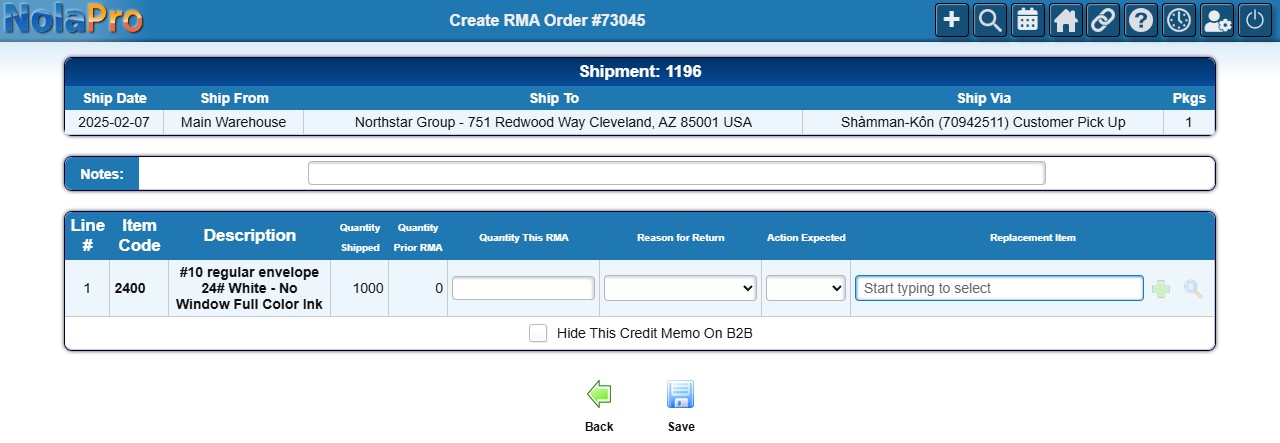
1) Start from the original shipment for the order being returned. The page restates the shipment (Ship Date, Ship From, Ship To, Ship Via, packages) so you can confirm you have the right one.
2) For each line the customer is returning, enter a Quantity This RMA. Only lines that actually shipped a positive quantity appear, and the quantity is capped at what shipped minus anything already returned on prior RMAs.
3) On every line with a quantity, pick a Reason for Return and an Action Expected — both are required to save.
4) Optionally set a Replacement Item if a different item will be sent back to the customer.
5) Use the Notes field for the customer's own words, their reference number, or handling instructions.
6) If the original shipment had a freight charge and you want to credit it, check Refund Freight Charge and confirm the amount.
7) Check Hide This Credit Memo On B2B to keep the eventual credit off the customer's portal.
8) Save to write the RMA.
Step 2: Receive the returned goods and generate the credit
Where: Receive RMA — opened from the Income -> Reports -> Orders -> RMA List or the Ship/Return view (Income -> Orders -> Fulfillment Order -> Process RMAs)
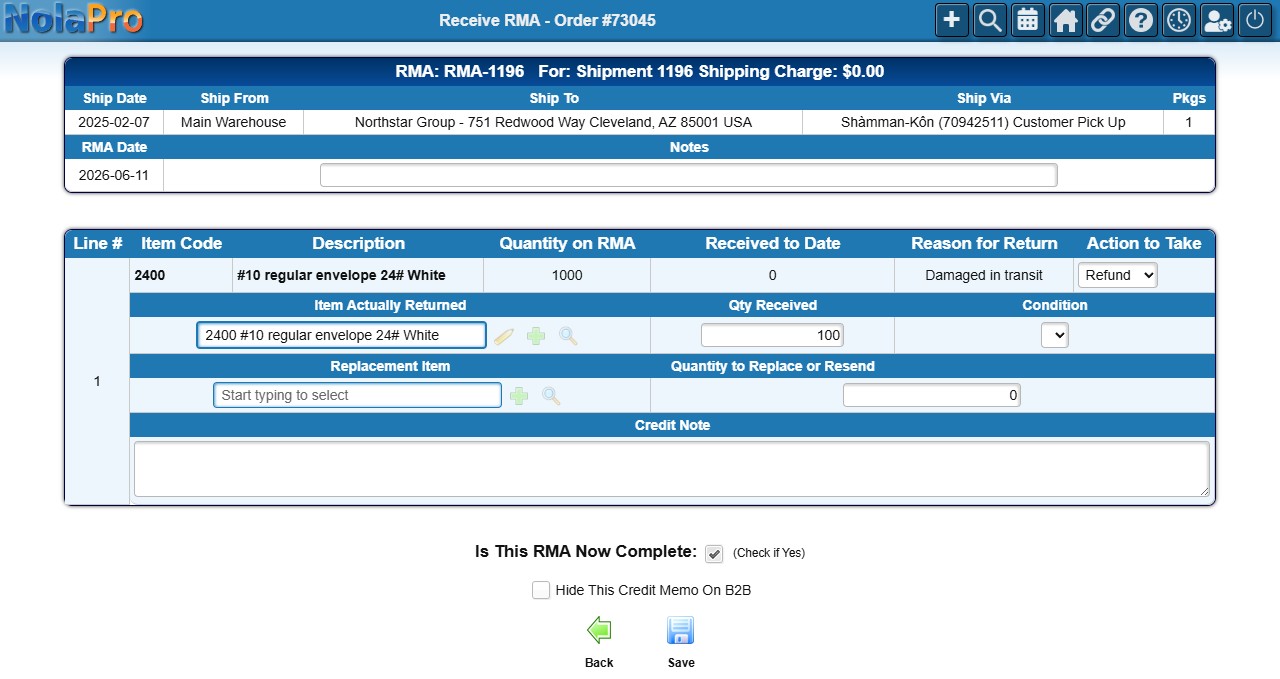
1) When the returned items physically arrive, open the RMA to receive them. Only lines that still have open quantity appear.
2) Set the Qty Received per line. It defaults to the full remaining quantity; lower it for a partial receipt and the RMA stays open for the rest.
3) Pick the Condition the goods came back in. The condition is what carries the restocking fee charged back to the customer: each condition has its own percentage or flat amount, set for it in Admin -> Orders -> RMA Setup. If Allow Users To Set Custom Restock Fee is turned on there, an extra set of controls appears beside Condition so you can override that fee on this line — choose Percentage or Flat Fee, then either pick a percentage from the list (or Custom... and type your own) or enter a flat amount. These controls start out pre-filled from the condition you picked.
4) Enter a Quantity to Replace or Resend on any line that needs a replacement shipped — a non-zero value creates a new replacement order on save.
5) Use the Credit Note field for a note about the credit being issued. An Extras section, for adding freeform credit lines (for example, freight) that aren't tied to a specific item, appears only when RMA Misc Credits are configured in Admin -> Orders -> RMA Setup.
6) Leave Is This RMA Now Complete checked to close the RMA after this receipt, or uncheck it to keep it open.
7) Save. In one transaction this creates the customer credit memo with full line/tax detail, increases inventory on-hand for the received quantity, optionally creates the replacement order, and links the receipt back to the RMA.
Step 3: Correct or cancel an RMA before it is received (optional)
Where: Edit RMA — opened from the Income -> Reports -> Orders -> RMA List or the Ship/Return view (Income -> Orders -> Fulfillment Order -> Process RMAs)
1) If an RMA was authorized incorrectly, edit it before any goods are received.
2) Adjust Quantity This RMA, Reason for Return, Action Expected, Replacement Item, or the Notes as needed, then Save.
3) To scrap the RMA entirely, use Delete — available only while nothing has been received. It cancels the RMA header and every line in one transaction and returns you to the Ship/Return view.
Notes
- You can only RMA lines that actually shipped a positive quantity. To credit something that was never shipped, use a manual credit memo instead.
- If the Reason and Action lists are empty, the dropdowns are blank and saves fail validation — set them up in RMA Setup first.
- Qty Received defaults to the remaining amount; lowering it produces a partial receipt and leaves the RMA open so the rest can be received later.
- "Is This RMA Now Complete" is the receiver's call — leaving it unchecked on a final receipt leaves the RMA in Pending status even when every line is fully received.
- The replacement order created when a Quantity to Replace or Resend is non-zero is a brand-new fulfillment order tied to the same customer and goes through the normal pick/ship flow.
- Once any quantity has been received against an RMA, the Delete option disappears — you cannot unwind a partially-received RMA; reverse received receipts through the credit-memo workflow instead.
- "Hide This Credit Memo On B2B" keeps the credit off the customer's portal history, but the customer may still see it in an Acknowledged Order email.
- Each save (create, receive, edit, delete) runs in a single transaction — everything is written or nothing is.