How to Adjust Item On-Hand Quantity and Cost
NolaPro provides two separate tools depending on what you need to fix. Use Item Adjustments when the on-hand quantity is wrong (shrinkage, damage, found stock, a recount): you add or remove units and the system posts the value change to the general ledger. Use Item Cost Adjustments when the quantity is correct but the cost per unit is wrong, or when you need to spread an additional cost such as freight across items that were received on a purchase order. Both tools create a general ledger voucher and an inventory transaction record for each adjusted item.
These are two independent tools, not a two-part sequence — run only the one that fixes your problem. Use Step 1 alone when just the count is off, Step 2 alone when just the cost is off, and run both only when you need to correct quantity and cost.
Requirements
GL Cost Codes and the Item Cost Adjustments Using AP Bills features apply to parts of this workflow.
Step 1: Adjust On-Hand Quantity
Where: Inventory -> Items -> Item Adjustments
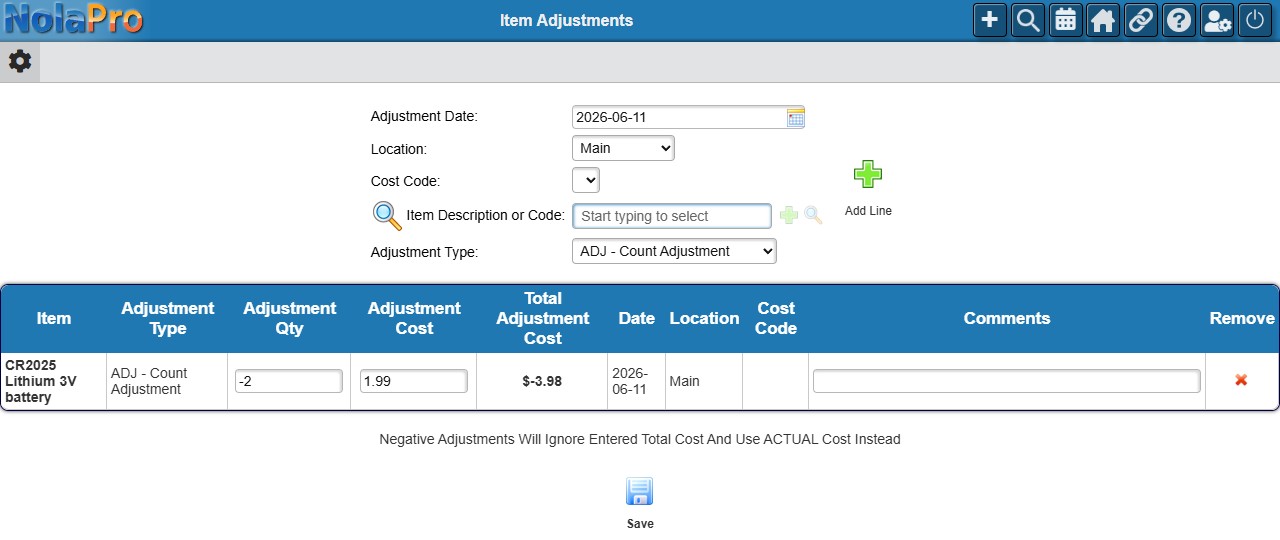
1) Set the Adjustment Date and the Location for the adjustment.
2) Choose the Adjustment Type if adjustment types are configured; otherwise pick an Adjustment GL Account for the offset. When cost codes are in use, set the Cost Code.
3) Select the item with Item Description or Code, then enter the Adjustment Qty (positive adds inventory, negative removes it). The Adjustment Cost is filled from the current inventory cost; you can change it. This cost only values the units you are adding or removing here — it does not re-cost stock you already have (see Step 2 for that).
4) Add a Comments value (required if your company requires comments on adjustments).
5) Click Add Line to queue the adjustment, then repeat for each item. Lines are held in the browser until you save.
6) Click Save to post all queued lines at once.
Step 2: Adjust Item Cost
Where: Inventory -> Items -> Item Cost Adjustments
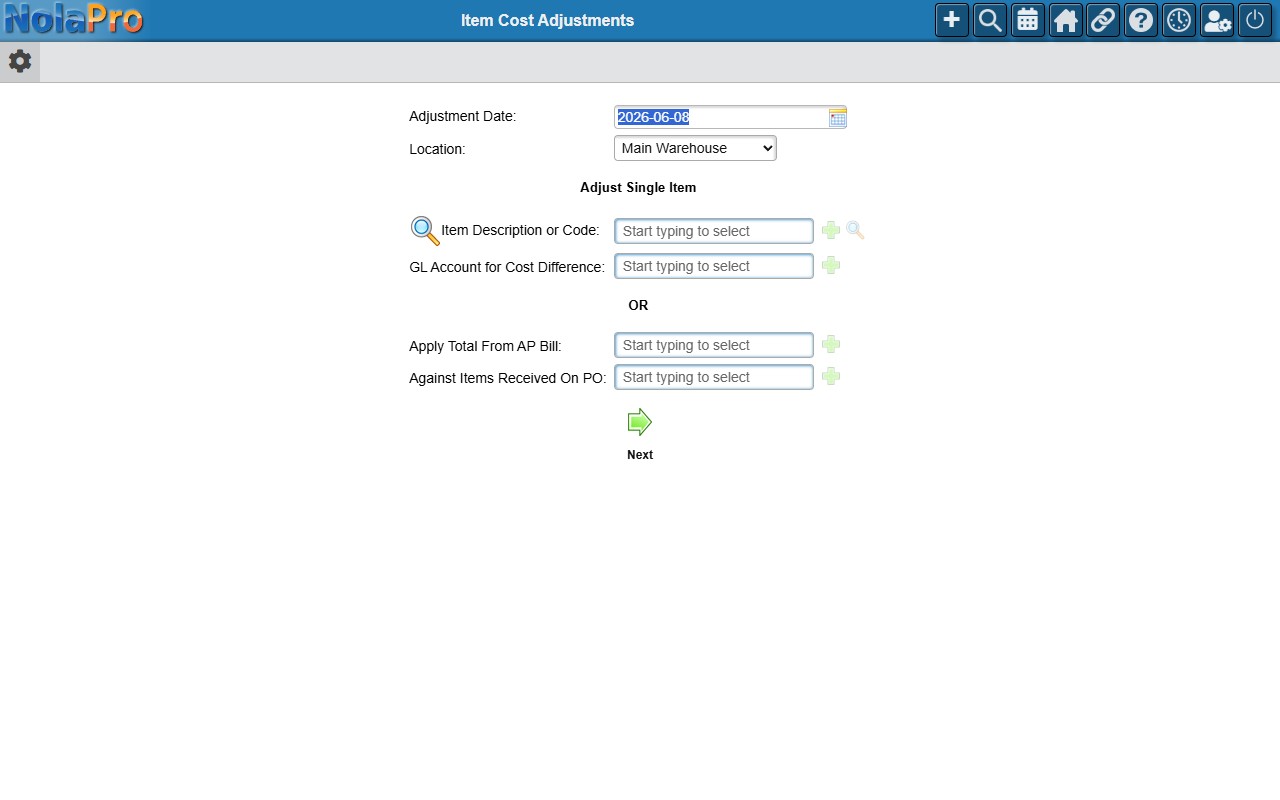
1) Set the Adjustment Date and Location.
2) For a single item, select the Item Description or Code and the GL Account for Cost Difference (the offset account).
3) To distribute a vendor bill instead, select Apply Total From AP Bill and the Against Items Received On PO so the bill total spreads across the items received on that purchase order.
4) Click Next to reach the entry form.
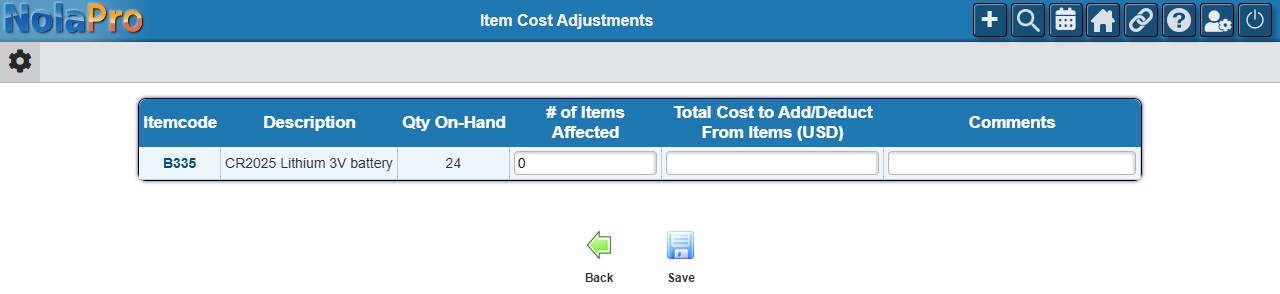
5) For each item, set # of Items Affected (cannot exceed on-hand) and Total Cost to Add/Deduct (positive adds cost, negative removes it), and optionally Comments. In AP Bill mode these are pre-filled from the bill, and the offset GL Account and Amount lines must net to zero against the cost change.
6) Click Save to post the cost adjustment.
Notes
- The Adjustment Cost on the quantity page (Step 1) only sets the cost of the units you add or remove in that transaction — it does not re-value stock you already have. To change the per-unit cost of existing on-hand quantity without changing the count, use Step 2 (Item Cost Adjustments).
- On the quantity adjustment page, lines are built client-side and nothing is written until you click Save; the cost per unit is fetched automatically when you pick an item.
- Quantity adjustments for POD or Other Charges item types are rejected, and lines for items with no inventory GL account (item-level or company default) are skipped.
- For negative quantity adjustments, when the cost method is not Weighted Average the system uses the actual layered cost on record instead of the cost you enter.
- The Item Cost Adjustments page is unavailable when the Actual Item Prices add-on is active; an error is shown instead.
- In AP Bill mode the bill total is distributed proportionally by each item's received quantity and unit price, with any rounding difference applied to the last item, and the cost change plus the GL offsets must sum to zero before saving.
- Each saved adjustment (on either page) creates a general ledger voucher with an inventory asset line and an offset line, plus an inventory transaction record.
- Item identifier (serial/lot number) entry rows appear beneath a line when identifiers are configured for that item.