
How to Convert QuickBooks Desktop Data to NolaPro
The QuickBooks Converter copies your lists, documents and account balances from QuickBooks Desktop into NolaPro. NolaPro talks to QuickBooks through the QuickBooks Web Connector, a free Intuit program that runs on the same Windows PC as QuickBooks. The result is a NolaPro company with your chart of accounts, customers, vendors, items, bills and invoices, plus a single journal entry that sets your starting account balances.
This article covers the Web Connector conversion from start to finish, including cloud-hosted NolaPro sites. To bring in data from a CSV or a QuickBooks IIF file instead, see What can be Imported?
Requirements
The QuickBooks(TM) Converter (US) feature must be enabled. You can check this at Tools -> System -> Add-ons. At least one bank account must also exist at Admin -> Ledger -> Bank Accounts.
You need a Windows PC running a desktop edition of QuickBooks. Intuit lists the current Web Connector as working with U.S. editions of QuickBooks Enterprise Solutions, Premier and Pro from 2015 or later, and with Canadian and UK editions from 2015 or later. It cannot connect to QuickBooks Online directly, see Step 1.
What Gets Imported
- Setup: GL accounts, system settings, terms, standard invoice terms, price levels, sales taxes, service classes, customer groups, job types, vendor types, units of measure, tax classes, shipping methods and item categories.
- Records: items, service types, sales reps, employees, customers, vendors, item discounts, payroll wage types and payroll additional types.
- Documents: purchase orders, bills, invoices and checks (listed as Customer Checks on the import page). Payments linked to an imported bill or invoice come over with it.
- Balances: one journal entry holding the balance of each account, listed as Starting Account Balances.
These are not imported: journal entries, GL transaction history, deposits, transfers, credit memos, vendor credits, sales orders, estimates, sales receipts, credit card charges, inventory adjustments and time tracking. Custom fields generally are not imported either.
Step 1: Move QuickBooks Online data to QuickBooks Desktop (optional)
Where: QuickBooks Online and QuickBooks Desktop
1) Skip this step if you already use QuickBooks Desktop.
2) Export your QuickBooks Online data to your computer and restore it into a desktop edition of QuickBooks. A QuickBooks Desktop trial works for this.
Step 2: Install the QuickBooks Web Connector
Where: The Windows PC that runs QuickBooks
1) Download the Web Connector from Intuit's QuickBooks Web Connector download page.
2) Extract the ZIP file, run the installer and follow the wizard.
Step 3: Open QuickBooks
Where: QuickBooks Desktop
1) Sign in as the QuickBooks Admin user, in single-user mode. QuickBooks asks an Admin to approve new connections.
2) Open the company file you want to export.
3) Leave QuickBooks open with that file until the export finishes.
Step 4: Download the Web Connector file
Where: Tools -> Export -> Export Data from QuickBooks
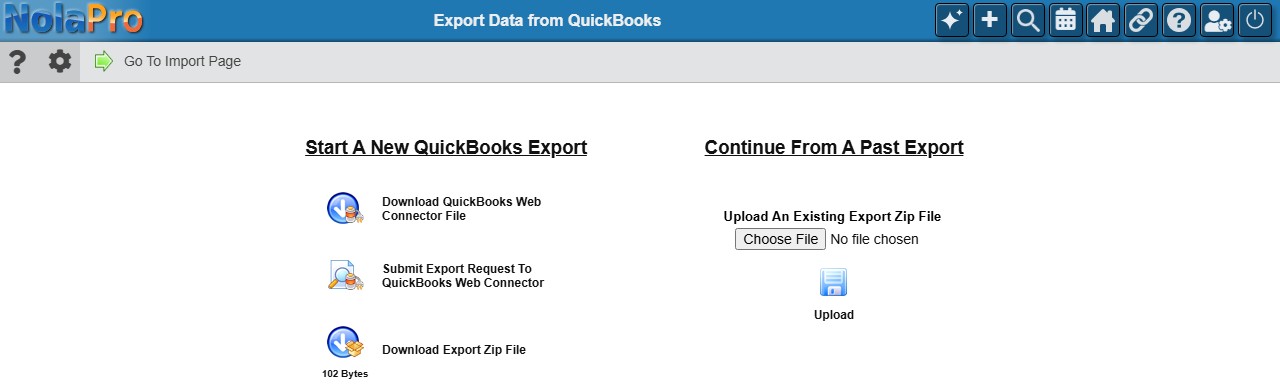
1) Open this page in a browser on the same PC that runs QuickBooks. The connection is limited to that PC's internet address.
2) Click Download QuickBooks Web Connector File.
3) If a Connection Type dialog appears, choose Local System when NolaPro and QuickBooks are on the same machine, Local Network when they are on the same local network, or Remote System when NolaPro is only reachable over the internet. Then click Next. When you reach NolaPro over the internet, as with cloud-hosted sites, this dialog is skipped and Remote System is used automatically.
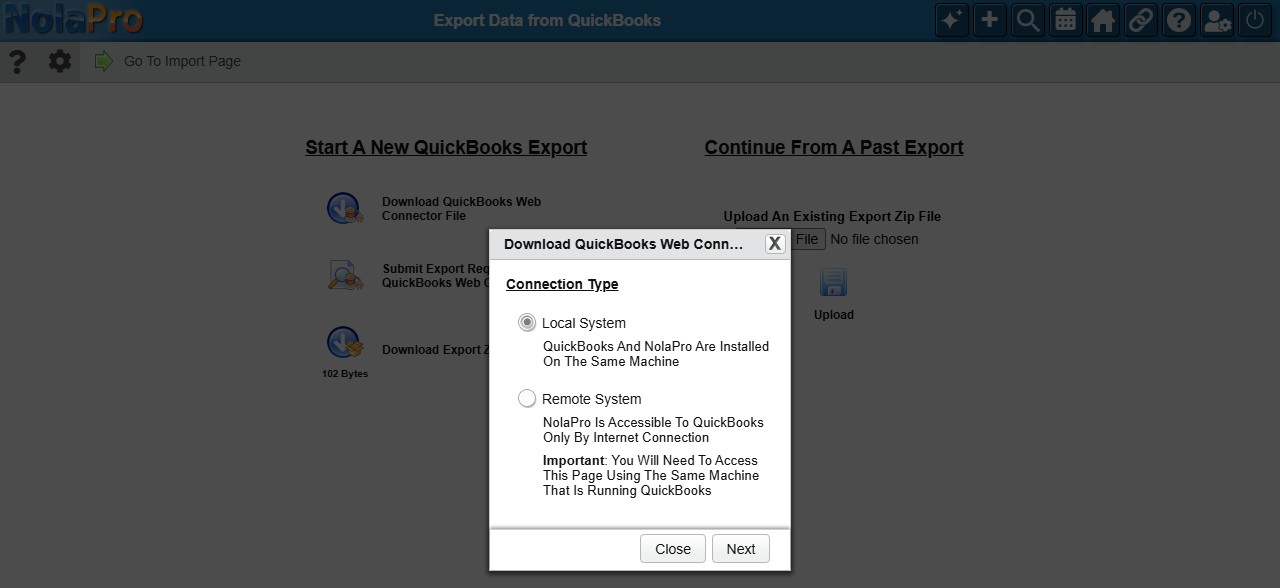
4) Remote System needs the NolaPro Client Application on this PC. If it is missing, the dialog shows Install The Client Application To Enable This Feature. Click it and run the installer, then refresh this page and click Download QuickBooks Web Connector File again.
5) Your browser downloads npconnect.qwc and the dialog shows a QWC Password. Copy the password, you need it in the next step.
Step 5: Add the file to the Web Connector
Where: QuickBooks Web Connector
1) Open the QuickBooks Web Connector and click Add an Application.
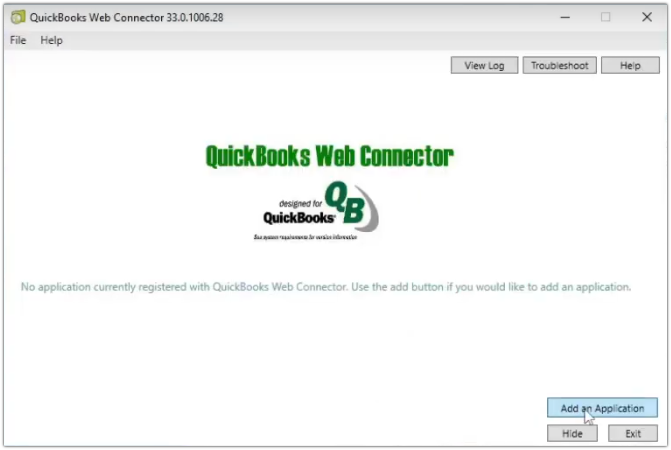
2) Select npconnect.qwc and click Open, then click OK on the Authorize New Web Service window.
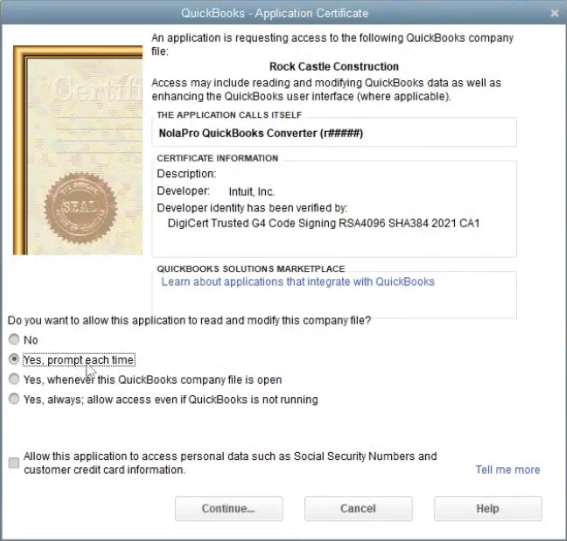
3) QuickBooks shows an Application Certificate window. Choose Yes, whenever this QuickBooks company file is open, click Continue, confirm, and click Done. If you want employee Social Security Numbers brought over, also check the box that allows access to personal data.
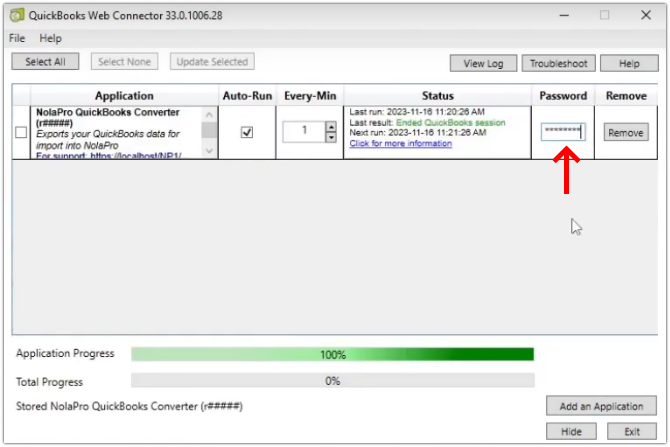
4) Back in the Web Connector, paste the password into the Password column on the NolaPro row and press Tab. Answer Yes if it asks to save the password.
Step 6: Start the export
Where: Tools -> Export -> Export Data from QuickBooks
1) Click Submit Export Request To QuickBooks Web Connector. The import page opens and starts on its own.
2) In the Web Connector, check the box on the NolaPro row and click Update Selected.
Step 7: Let the import run
Where: Tools -> Import -> Import From QuickBooks (QWC)
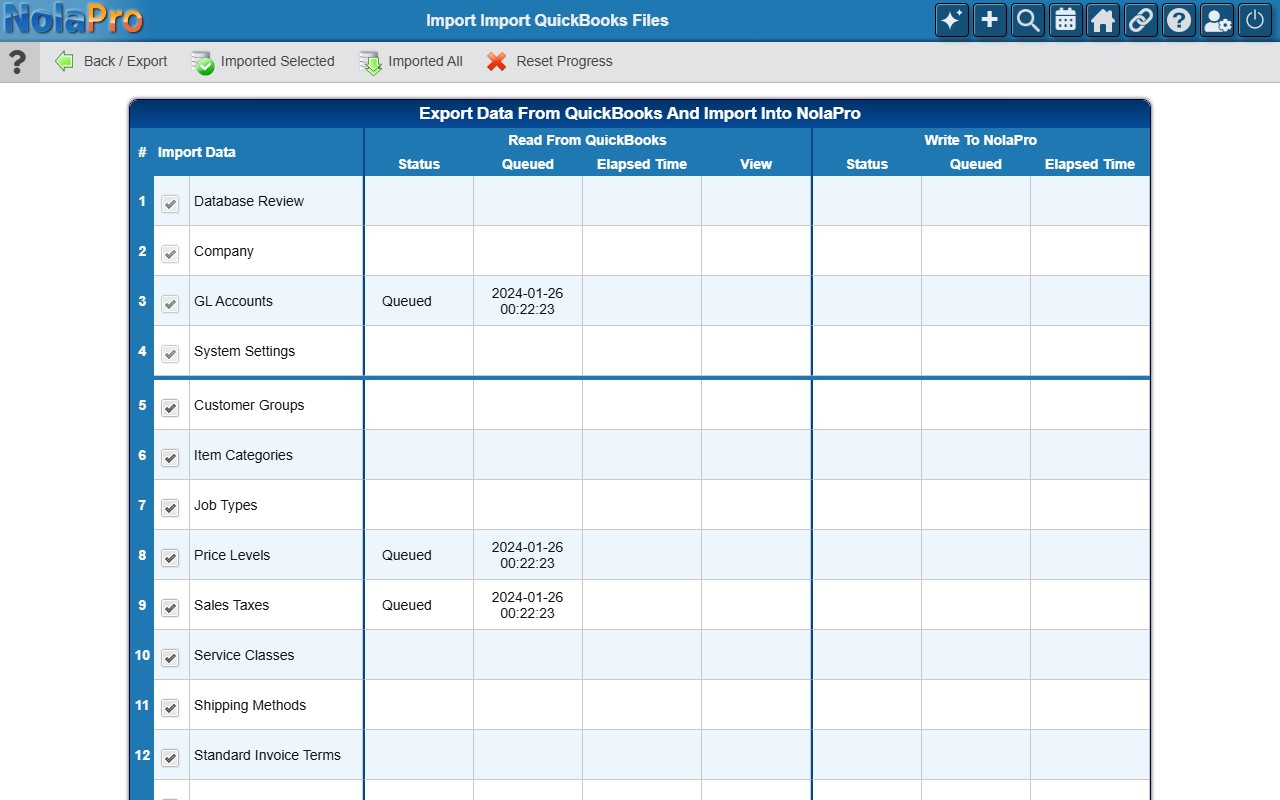
1) Keep this page open. The Read From QuickBooks columns show what the Web Connector has sent, and the Write To NolaPro columns show what has been imported. NolaPro only writes records while this page is open.
2) If an A Required Setting Is Undefined notice appears, fill in the setting and save it. The import then continues.
3) If an Error Importing message appears, the import pauses. Click Show Details, read the error, then choose Retry or, when offered, Ignore / Continue.
4) Near the end, while Starting Account Balances imports, a notice asks you to update your default GL accounts. Click each link, review the accounts in the new tab and save.
5) If you left the page, open it again and click Continue. If you clicked Pause, refresh the page first. If you opened the page before starting, click Imported All, or check the rows you want and click Imported Selected.
6) When every row under Read From QuickBooks has finished, click Download Export Zip File on the Export Data from QuickBooks page to keep a copy of what was exported.
Step 8: Review your data
Where: Ledger -> Reports -> Balance Sheet
1) Run the Balance Sheet in NolaPro as of today and compare it with the same report in QuickBooks Desktop. If the totals differ, submit a support ticket before you change anything.
2) To change a starting balance, go to Ledger -> Journal Entries and open the entry named Quick Books GL Account Import. It was created on the day of the import and is posted to the first of that month. If it opens as read-only, click Unpost this Voucher, edit the entry and post it again.
3) Spot-check your customer, vendor and item lists and your open invoices and bills.
Notes
- Past periods on the Profit & Loss. QuickBooks balances come over as one journal entry in the month you import, not as monthly activity. Ledger -> Reports -> Profit & Loss Statement will not match QuickBooks for past periods, and the current month can include those balances.
- Out-of-balance amounts. If the QuickBooks balances do not net to zero, NolaPro posts the difference to a GL account named QB_BAD_BALC (Out Of Balance QuickBooks Migration). Look for this account after the import.
- Download the Web Connector file once. Each download creates a new password and replaces the previous connection. If you download again, remove the old row from the Web Connector, add the new file, enter the new password and submit the export again. While an export is queued, the page shows Continue Export/Import instead of the download option. To clear the queue, click Pause on the import page.
- A localhost address is normal on cloud sites. With Remote System, the Web Connector shows a localhost address because it connects to the NolaPro Client Application on your PC, which passes the data to your NolaPro site.
- Do not rerun without help. Reset Progress clears the exported data and the import progress. Importing again creates duplicate bills and a second starting-balance entry, so submit a support ticket first.
Troubleshooting
- The Web Connector says No data exchange required. Nothing is waiting for it yet, or it has finished. Confirm you clicked Submit Export Request To QuickBooks Web Connector and check the import page.
- The import page stays on Queued. Confirm QuickBooks is open with the company file, the NolaPro row is checked in the Web Connector and you clicked Update Selected.
- Error 0x80040417, or a message that a company data file must be open. Open QuickBooks and the company file, then click Update Selected again.
- The Web Connector rejects the connection or reports an authentication error. Confirm the password was pasted in full. If your PC's internet address changed since you downloaded the file, or you downloaded it on a different PC, download it again on the QuickBooks PC.
- The Web Connector closes on its own or shows Object reference not set. Remove the NolaPro row, add the same npconnect.qwc again and enter the same password. A new download is not needed. If it happens again, restart the PC and open QuickBooks as the Admin user before opening the Web Connector.
- Another update in progress, or QuickBooks cannot close the company file. Close every Web Connector window and restart the PC. Open QuickBooks first, then the Web Connector, and click Update Selected.
- Still stuck? Click View Log in the Web Connector, or open C:\ProgramData\Intuit\QBWebConnector\log\QWCLog.txt, and attach the file when you submit a NolaPro support ticket.
QuickBooks(TM) is a registered trademark of Intuit, Inc.