
How to Perform a Bank Reconciliation
A bank reconciliation compares the balance the bank reports on your statement against the cash balance in your General Ledger, clears the transactions that have appeared on the statement, and explains any difference (such as outstanding checks or deposits in transit). NolaPro keeps every completed reconciliation in a searchable list; each one opens an interactive worksheet where you clear items and record service charges and interest. Use this workflow to perform a new reconciliation or to re-open a completed one.
Step 1: Find or Start a Reconciliation
Where: Ledger -> Bank Reconciliation
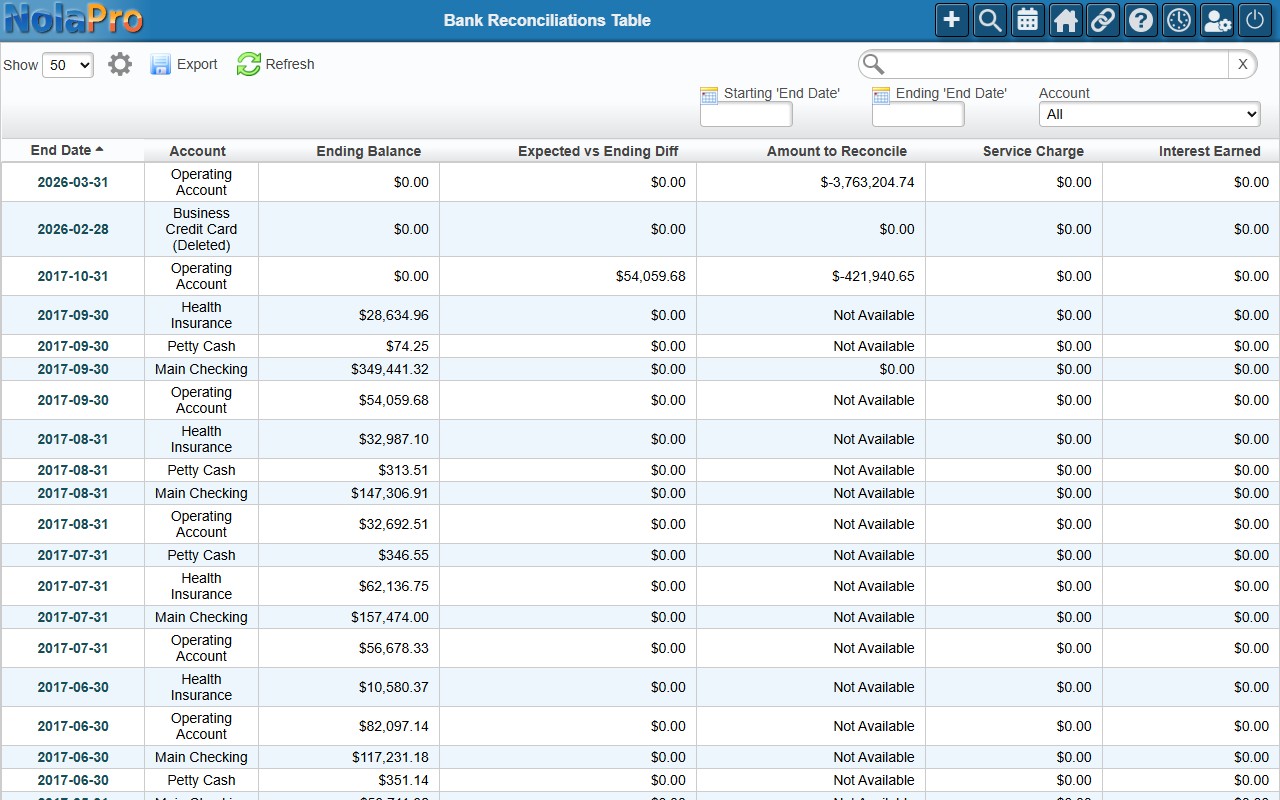
1) This page lists every reconciliation already recorded for the company. Narrow the list with the Account filter to show only one bank account.
2) Use Start Date and End Date to limit the list to reconciliations whose end date falls within a range.
3) Each row shows the ending balance, the difference between the expected and ending balance, the amount still to reconcile, the service charge, and interest earned. Account names carry a "(Deleted)" or "(Inactive)" tag when the underlying bank account has been removed or deactivated.
4) To start a new reconciliation, click New Bank Reconciliation. To re-open an existing one, click its end date link. Both open the reconciliation worksheet.
Step 2: Work the Reconciliation Worksheet
Where: Reconciliation worksheet (opened from Step 1)
1) Enter (or confirm) the Bank Statement Ending Balance from your bank statement.
2) Optionally enter Interest Earned and Service Charges from the statement; NolaPro automatically posts matching GL vouchers for these when you save.
3) Work through the transaction list, checking On Statement for each item that has cleared the bank. The running totals update as you work — the goal is to bring the Amount to Reconcile to $0.
4) When finished, Save the reconciliation. The entry then appears (or updates) in the list in Step 1.
5) Use the Print button on the worksheet to generate the reconciliation report showing how the bank and GL balances were brought into agreement.
How the Totals Are Calculated
Two running totals drive the reconciliation, and the goal is to make them equal.
- Adjusted bank balance — starts from the bank statement ending balance, then adds the deposits, ACH deposits, GL receipts, and incoming transfers that you have recorded but that have not yet cleared the bank (plus any received money not yet placed on a deposit), and subtracts the checks and GL payments that have not yet cleared. In other words: ending bank balance + outstanding deposits and incoming transfers + undeposited receipts − outstanding (uncleared) checks and payments.
- GL (book) balance — the cash balance of the bank's General Ledger account from your posted transactions.
- Amount to Reconcile = adjusted bank balance − GL balance. The reconciliation is complete when this is $0; any non-zero figure is the difference you still need to explain (typically a transaction that is on one side but not the other).
When you record a service charge or interest earned on the reconciliation, NolaPro posts a matching General Ledger voucher automatically: interest earned debits the bank account and credits your Interest Income account, while a service charge debits your Bank Service Charges expense account and credits the bank account. (If you later change the amount, the prior voucher is reversed and a new one posted.) These voucher accounts come from your company's GL defaults, so they must be set before service charges or interest can post.
Notes
- The reconciliation worksheet opens by clicking the end date link in the table (to re-open an existing reconciliation) or by clicking New Bank Reconciliation to start a new one. Neither is a separate standalone menu item — both are accessed from the Bank Reconciliation list. Use the Print button on the worksheet itself to produce the report.
- In the table, the service charge and interest earned amounts link directly to the matching GL voucher detail whenever a voucher has been posted for that amount.
- The report can include a Cost Code column for each detail section when the "Show Bank Rec Cost Codes" user preference is turned on, and a GL Category column when the "Show Bank Rec GL Categories" user preference is turned on.
- Set Show Deposit Details to Yes on the reconciliation options form (where you choose the bank account and statement date) to list, under each deposit in the worksheet's Deposits section, the records that make it up: invoice payments (invoice number and customer), non-invoice payments (payment note and customer), order deposits (order number and customer), and direct GL entries (the voucher). Each entry links to its source record, so you can identify a deposit without opening it. The choice is remembered for your user.
- If the optional Bank Account Linking feature is enabled and the checking account has been linked to your bank, NolaPro pulls the bank's transactions for the statement period directly from the bank while you reconcile, so you can match each downloaded transaction to its NolaPro entry instead of clearing items by hand against a paper statement. Linking is set up per bank account, and on a hosted install it is available without any extra configuration.