How to Set Up a New Company for Multi-Company Use
NolaPro can hold more than one company in a single installation, each with its own customers, vendors, ledger, and settings, while letting users switch between the companies they have access to. When you add a new company, NolaPro seeds it from your currently active company: it copies the chart of accounts, payroll tax tables, and module settings, creates a default check account, and grants you full supervisor access to the new company. You can optionally copy vendors and existing user rights too. After creation, you open the company's edit page to finish configuring contact details, branding, and behavior. This workflow covers both the create step and the follow-up edit step.
Requirements
The core create-and-edit workflow needs no add-ons. A few optional fields appear only when the matching add-on is enabled: the Company Time Zone field with Company Time Zones, the Base Currency field with the Multi-Currency Module, and the optional starter-login fields with Advanced User Rights.
Step 1: Create the New Company
Where: Admin -> System -> Company New/Edit, then Add

1) Enter a Company Name (required).
2) If enabled for your installation, set the Company Time Zone and Base Currency for the new company.
3) Set general behavior options as needed (for example, Short Ship To Screen, Show Auto Complete IDs, and the journal-entry display options).
4) Enter Contact details (phones, Email, AR Email, Order Email, AP Email, Web Address) and the Address.
5) Leave Copy Vendors From Current Company and Copy User Rights From Current Company checked to carry those over, or uncheck them to start clean.
6) Optionally create a starter login for the company using the new-user fields (Username, Password/Confirm Password, and User Group); a username is required only if you enter a password.
7) Save. NolaPro creates the company and returns you to the Company New/Edit page, where you select the new company to finish configuring it.
Step 2: Finish Configuring the Company
Where: Admin -> System -> Company New/Edit
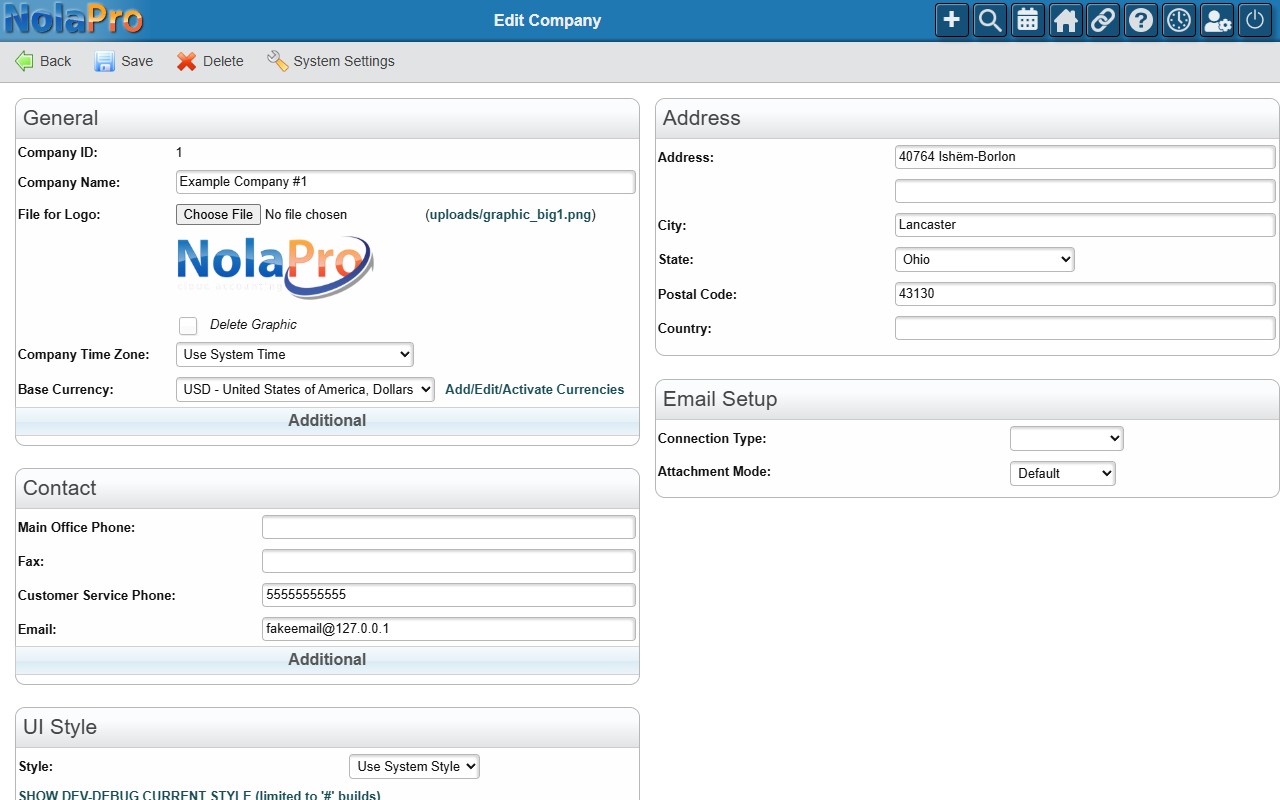
1) Select the new company on the Company New/Edit page to open its edit form.
2) Review and complete the General, Contact, and Address sections.
3) Upload a File for Logo to brand the company (this is also copied to the B2B portal).
4) Configure the Email Setup section for this company's outbound mail.
5) Use the User Access (View All) table below the form to confirm which users can access this company, and remove access where needed.
6) Save your changes.
Notes
- The Add New Company form is hidden if you have reached your licensed company limit; an upgrade prompt appears instead.
- On save, the chart of accounts, payroll tax tables, and AR/AP/Inventory module settings are copied from your current company, GL account links are remapped, and a default check account is created.
- Price levels and inventory locations are not copied; the new company starts with no default price level or location, so set those up in the new company after creation.
- The user creating the company is automatically granted full supervisor access to it.
- Copy Vendors duplicates all active vendors; Copy User Rights duplicates access permissions for all active users into the new company.
- The optional new-user section appears only when Advanced User Rights is enabled and at least one user rights group exists; otherwise a link to set up a rights group is shown.
- Deleting a company from the edit page is a soft delete that marks it inactive; if no other active company remains, you are logged out.
- You cannot remove your own access to the company you are currently logged into.